Installing VPN software on a router is a great way to protect devices on your network, such as computers, smart TVs, smartphones and gaming consoles. However, although most best VPNs have router-support, setting up a VPN on a router requires manual configuration, which can be difficult for newbies. Luckily, we compiled a step-by-step guide to show you how to set up a VPN on a router.
Regardless of whether you use a router from ASUS, Netgear, Linksys, TP-Link, D-Link, Xfinity or Huawei, we have you covered. We’ll show you how to install a VPN on a router to enhance your online privacy and security. However, before we get into the installation guides, let’s check your router’s compatibility to confirm that it’s able to support a VPN installation.
Learn more about our editorial team and our research process.
-
05/14/2024 Facts checked
Article rewritten with step-by-step guides for specific router models, including ASUS, Netgear, Linksys and Huawei.
VPN Router Compatibility
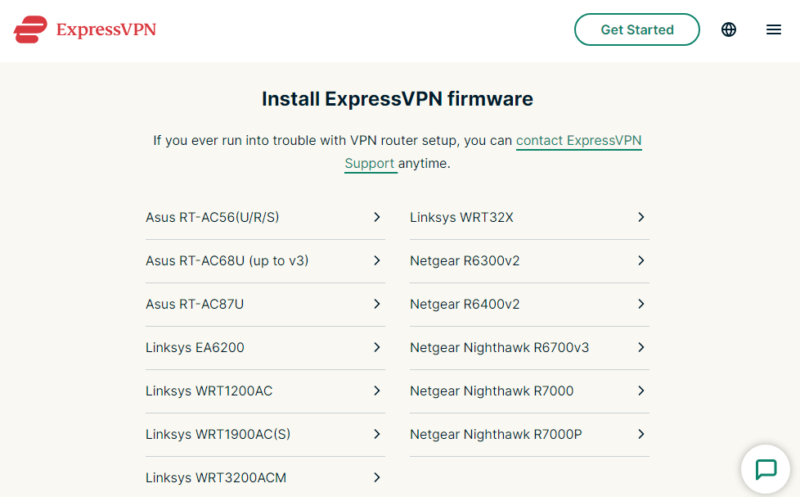
Not all routers are compatible with VPNs, and vice versa. Some don’t support VPNs at all, while others support protocols that may not be available on your go-to VPN. Before you begin the installation, you must confirm whether the router is compatible with VPNs.
Go to the router’s manufacturer website or check the product manual to confirm that it’s compatible. While you’re at it, also confirm the VPN protocols your router can work with to simplify your search for a compatible VPN. If your router isn’t compatible, see if you can upgrade it with third-party router firmware such as DD-WRT or Tomato software.
That said, be cautious when flashing your router with third-party firmware, as it can void your warranty. You could also “brick” the router, which would render it unusable.
Setup: 8 Steps to Install Your VPN on a Router
If you have confirmed that the router and VPN are compatible, the next step is to get them to work together. In this section, we’ll show you how to install a VPN on your router. Keep in mind that the process may differ based on the router model and the VPN service, but it should be broadly similar. For this example we used a Huawei router and Surfshark to illustrate the process.
- Open the Router’s Login Page
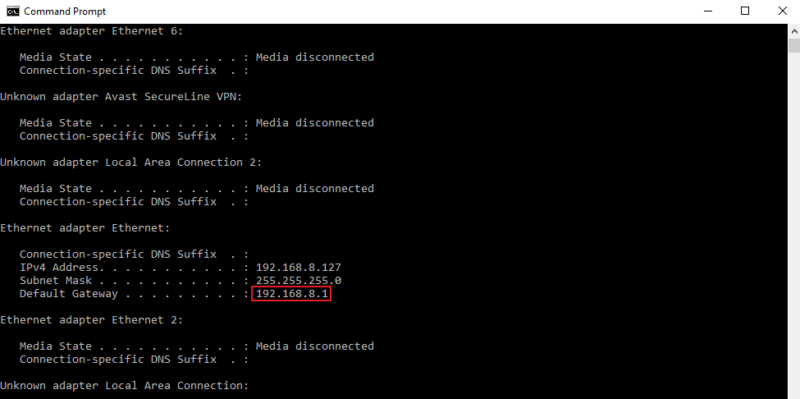
Type the router’s internet protocol (IP) address into your web browser’s search bar and hit “enter.” If you don’t know the router’s IP (for Windows 10), open the Command Prompt app on your computer, type“ipconfig”and press “enter.” Find the router’s IP address in the “default gateway” line.

- Log In to the Router’s Control Panel
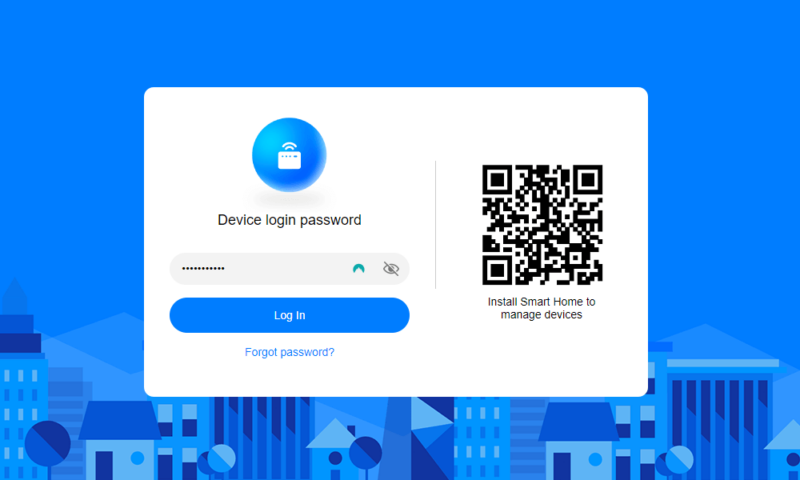
Enter the router’s login credentials and hit “enter” or click “log in”:

- Locate the VPN Tab
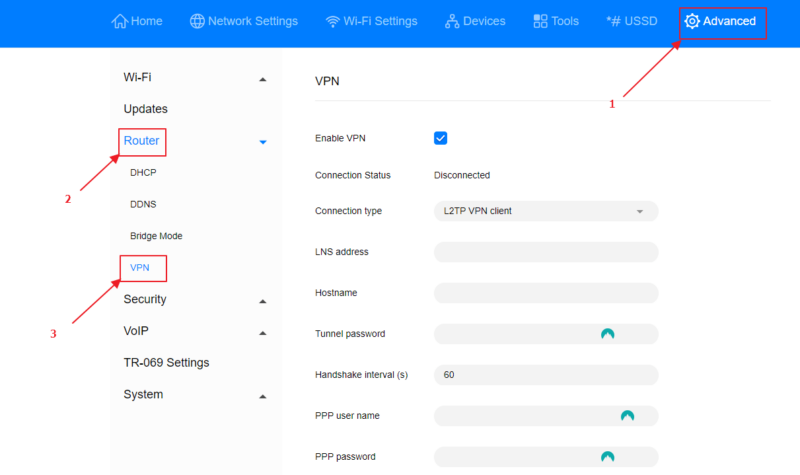
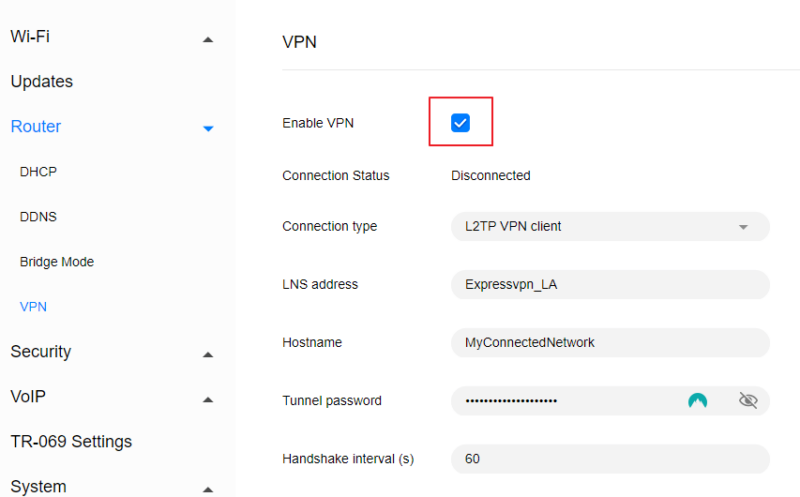
Open the router’s “advanced” tab and go to “router” to locate the VPN tab. Check the “enable VPN” box to open the configuration options. The location of the VPN client will vary across router models and brands.

- Log In to Your VPN Account
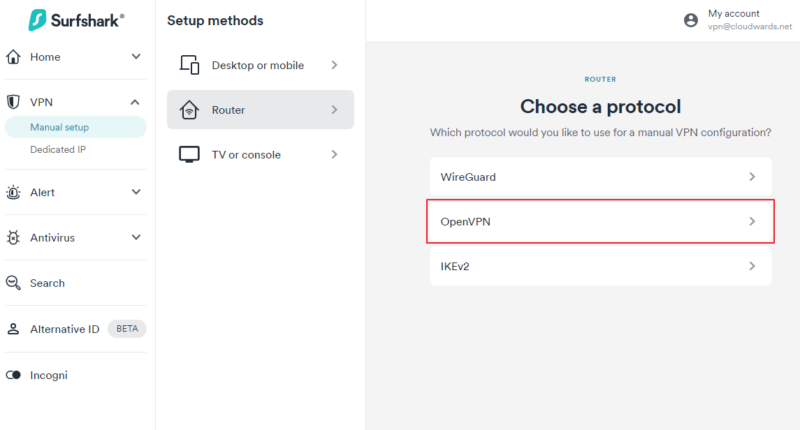
Log in to your VPN account and go to “manual setup.” Select “router” and open the protocol corresponding to the connection type your router supports. For example, if your router supports OpenVPN, select that protocol in the VPN provider dashboard to access the configuration details.

- Fill In the Relevant Details
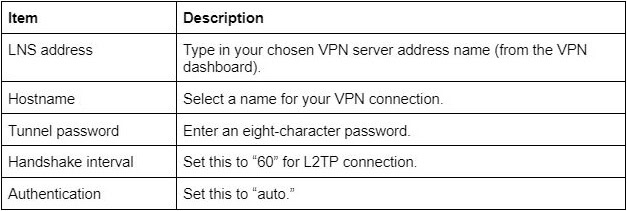
Copy and paste the username and password in the “PPP username” and “PPP password” boxes on the router’s VPN setup page. Fill in the other details as follows:

- Complete the Configuration
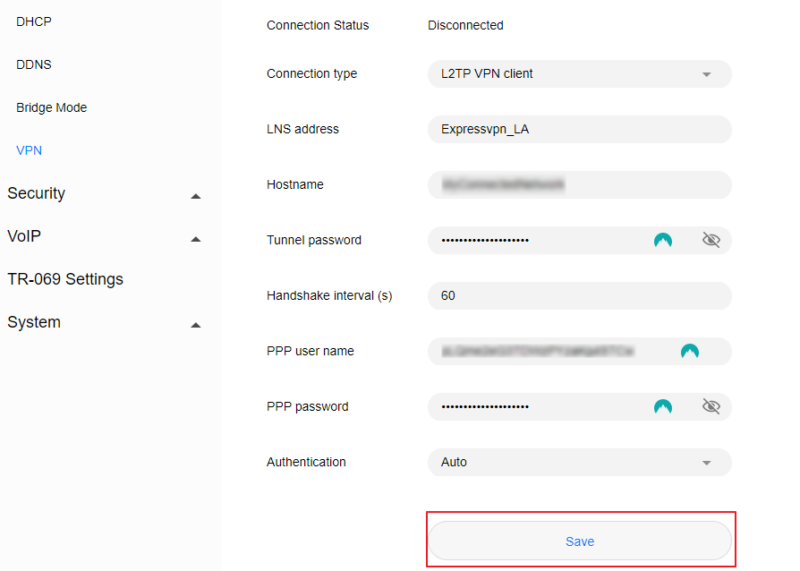
Double-check every detail and click “save.” If everything is okay, the connection status will change to “connected.” That’s it; every device connected to your home network — from mobile devices to your printer — will now leverage VPN protection.

- Change the Server Address
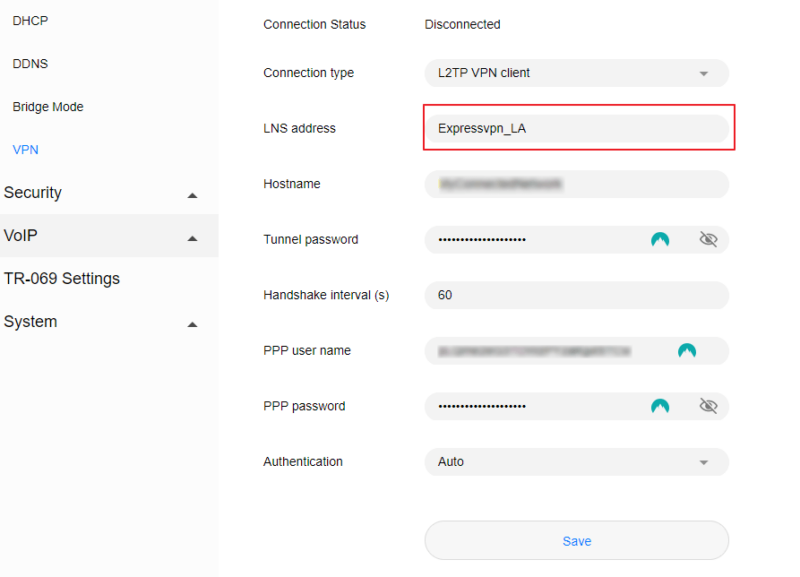
The VPN will always be connected to the VPN server selected during configuration. If you need a different IP address, go to your VPN account and choose a different server. Input the VPN server IP address or name in the “LNS address” section.

- Turn Off the VPN Router
To turn off the VPN on the router, uncheck the “enable VPN” box. This option may vary across router models and brands.

{“@context”:”https://schema.org”,”@type”:”HowTo”,”name”:”How to”,”description”:”These steps show how to set up a VPN on a router.”,”totalTime”:”P00D04M00S”,”supply”:0,”tool”:0,”url”:”https://www.cloudwards.net/how-to-setup-a-vpn-on-a-router/#how-to”,”image”:{“@type”:”ImageObject”,”inLanguage”:”en-US”,”url”:”https://www.cloudwards.net/wp-content/uploads/2024/05/how-to-set-up-a-vpn-on-a-router.png”},”step”:[{“@type”:”HowToStep”,”name”:”Open the Routeru2019s Login Page”,”position”:1,”url”:”https://www.cloudwards.net/how-to-setup-a-vpn-on-a-router/#open-the-routers-login-page”,”itemListElement”:{“@type”:”HowToDirection”,”text”:”Type the routeru2019s internet protocol (IP) address into your web browseru2019s search bar and hit u201center.u201d If you donu2019t know the routeru2019s IP (for Windows 10), open the Command Prompt app on your computer, typeu201cipconfigu201dand press u201center.u201d Find the routeru2019s IP address in the u201cdefault gatewayu201d line.n”},”image”:{“@type”:”ImageObject”,”inLanguage”:”en-US”,”url”:”https://www.cloudwards.net/wp-content/uploads/2024/05/Confirm-routers-IP.png”}},{“@type”:”HowToStep”,”name”:”Log In to the Routeru2019s Control Panelu00a0″,”position”:2,”url”:”https://www.cloudwards.net/how-to-setup-a-vpn-on-a-router/#log-in-to-the-routers-control-panel”,”itemListElement”:{“@type”:”HowToDirection”,”text”:”Enter the routeru2019s login credentials and hit u201centeru201d or click u201clog inu201d:n”},”image”:{“@type”:”ImageObject”,”inLanguage”:”en-US”,”url”:”https://www.cloudwards.net/wp-content/uploads/2024/05/Router-login-page.png”}},{“@type”:”HowToStep”,”name”:”Locate the VPN Tab”,”position”:3,”url”:”https://www.cloudwards.net/how-to-setup-a-vpn-on-a-router/#locate-the-vpn-tab”,”itemListElement”:{“@type”:”HowToDirection”,”text”:”Open the routeru2019s u201cadvancedu201d tab and go to u201crouteru201d to locate the VPN tab. Check the u201cenable VPNu201d box to open the configuration options. The location of the VPN client will vary across router models and brands.n”},”image”:{“@type”:”ImageObject”,”inLanguage”:”en-US”,”url”:”https://www.cloudwards.net/wp-content/uploads/2024/05/Open-router-VPN-tab.png”}},{“@type”:”HowToStep”,”name”:”Log In to Your VPN Account”,”position”:4,”url”:”https://www.cloudwards.net/how-to-setup-a-vpn-on-a-router/#log-in-to-your-vpn-account”,”itemListElement”:{“@type”:”HowToDirection”,”text”:”Log in to your VPN account and go to u201cmanual setup.u201d Select u201crouteru201d and open the protocol corresponding to the connection type your router supports. For example, if your router supports OpenVPN, select that protocol in the VPN provider dashboard to access the configuration details.n”},”image”:{“@type”:”ImageObject”,”inLanguage”:”en-US”,”url”:”https://www.cloudwards.net/wp-content/uploads/2024/05/VPN-manual-setup.png”}},{“@type”:”HowToStep”,”name”:”Fill In the Relevant Details”,”position”:5,”url”:”https://www.cloudwards.net/how-to-setup-a-vpn-on-a-router/#fill-in-the-relevant-details”,”itemListElement”:{“@type”:”HowToDirection”,”text”:”Copy and paste the username and password in the u201cPPP usernameu201d and u201cPPP passwordu201d boxes on the routeru2019s VPN setup page. Fill in the other details as follows:n”},”image”:{“@type”:”ImageObject”,”inLanguage”:”en-US”,”url”:”https://www.cloudwards.net/wp-content/uploads/2024/05/fill-in-the-relevant-details.jpg”}},{“@type”:”HowToStep”,”name”:”Complete the Configuration”,”position”:6,”url”:”https://www.cloudwards.net/how-to-setup-a-vpn-on-a-router/#complete-the-configuration”,”itemListElement”:{“@type”:”HowToDirection”,”text”:”Double-check every detail and click u201csave.u201d If everything is okay, the connection status will change to u201cconnected.u201d Thatu2019s it; every device connected to your home network — from mobile devices to your printer — will now leverage VPN protection.n”},”image”:{“@type”:”ImageObject”,”inLanguage”:”en-US”,”url”:”https://www.cloudwards.net/wp-content/uploads/2024/05/VPN-configuration.png”}},{“@type”:”HowToStep”,”name”:”Change the Server Address”,”position”:7,”url”:”https://www.cloudwards.net/how-to-setup-a-vpn-on-a-router/#change-the-server-address”,”itemListElement”:{“@type”:”HowToDirection”,”text”:”The VPN will always be connected to the VPN server selected during configuration. If you need a different IP address, go to your VPN account and choose a different server. Input the VPN server IP address or name in the u201cLNS addressu201d section.n”},”image”:{“@type”:”ImageObject”,”inLanguage”:”en-US”,”url”:”https://www.cloudwards.net/wp-content/uploads/2024/05/Changing-VPN-server.png”}},{“@type”:”HowToStep”,”name”:”Turn Off the VPN Router”,”position”:8,”url”:”https://www.cloudwards.net/how-to-setup-a-vpn-on-a-router/#turn-off-the-vpn-router”,”itemListElement”:{“@type”:”HowToDirection”,”text”:”To turn off the VPN on the router, uncheck the u201cenable VPNu201d box. This option may vary across router models and brands.n”},”image”:{“@type”:”ImageObject”,”inLanguage”:”en-US”,”url”:”https://www.cloudwards.net/wp-content/uploads/2024/05/turning-VPN-connection-off.png”}}]}
Connecting a VPN on a Router
In this section, we’ll show you how to set up VPN software on the most popular router models. If your router’s not on this list, check out our guides for installing DD-WRT or Tomato Firmware on any router.
Pros and Cons of Using a VPN on a Router
The most significant benefit of using a VPN on a router is that it helps protect all devices at home, from personal computers and smart TVs to smart doorbells and Nintendo Switches. There are other benefits, but also a few drawbacks.
Pros:
- This combo provides always-on protection to all devices connected to your home network.
- It helps protect devices that don’t support native VPN apps.
- There is no need to repeatedly connect to the VPN because it’s always on.
- Setting up a VPN on a router helps bypass the simultaneous connection limit that some VPN providers set.
- This method improves your devices’ battery life.
Cons:
- Setting the VPN up and making fine-grained adjustments can be challenging.
- VPN-router compatibility issues can present serious roadblocks.
- Some routers only support less secure VPN protocols.
- You can’t connect certain home devices to other VPN servers.
The Best VPN for Routers
ExpressVPN, NordVPN and Surfshark are some of the best VPNs for routers. You can start a free trial with one of these providers or make the most of their 30-day money-back guarantees to familiarize yourself with the VPN functionality risk-free.
- ExpressVPN: This is a secure VPN with unmatched streaming capabilities. It works with different router models that support OpenVPN and is one of the best VPNs with a router management portal. Learn more in our full ExpressVPN review.
- NordVPN: This VPN delivers top-notch security and is the fastest VPN out there. Like ExpressVPN, NordVPN ditched the less secure protocols, meaning it’s only compatible with routers that support modern protocols. Read our comprehensive NordVPN review to learn more.
- Surfshark: This is a budget-friendly alternative to ExpressVPN and NordVPN. It’s compatible with various router models that support secure protocols like OpenVPN. Learn more in our Surfshark review.
Final Thoughts
Setting up a VPN on your router requires more effort than installing a native client on desktop or mobile devices. However, the time and effort expended on the configuration process yields notable benefits, such as bypassing the simultaneous device limit and ensuring all home devices are protected.
The VPN-router combo may be for you if you don’t need to frequently change router settings for online activities. If you need to access different global streaming sites, which entails constantly changing the VPN server, install the VPN app on individual devices. If various members of your household need to connect to different servers, this combination won’t be effective.
Have you ever installed a VPN on your router? Which VPN service and router model did you use? What were the most significant advantages and disadvantages of using the VPN-router combination? We’d like to hear about it in the comments. As always, thanks for reading.
FAQ: Putting a VPN on a Router
-
Yes, you can put a VPN on your router, but first confirm whether the router is VPN compatible.
-
To set up a VPN on a router, log in to the router control panel and navigate to the VPN tab. Copy the username, password and server IP address from your VPN account and paste them into the router’s VPN tab. Save to apply the VPN settings.
-
Yes, the VPN shows up on the router once the VPN router configuration is complete.
-
To set up Private Internet Access (PIA) VPN on your router, check out the installation guide for your specific router model. PIA offers different guides for various router brands and models.
The post How to Set Up a VPN on a Router in 2024: Step-By-Step Installation Process for 8 Different Router Models appeared first on Cloudwards.


