Why you can trust us
- 407 Cloud Software Products and Services Tested
- 3056 Annual Software Speed Tests
- 2400 plus Hours Usability Testing
Our team of experts thoroughly test each service, evaluating it for features, usability, security, value for money and more. Learn more about how we conduct our testing.
Key Takeaways: How to Change DNS Servers?
- Changing your DNS settings has numerous benefits, like increased speed, security and privacy.
- Setting up a custom DNS server is easy to do, though the process differs between devices.
- Besides a manual setup, you can also change your DNS with a VPN. This doesn’t require any kind of setup apart from installing the VPN app.
Every time you connect to a website, there’s a DNS server in the background quietly handling all of your communication. DNS servers translate your browser input into language that’s easier for website servers to understand, so they’re crucial to how the web works.
However, the operator of the DNS server you use can also see all of your online traffic. This is why it’s crucial to know how to change DNS servers.
Using a secure DNS server, like the ones operated by VPNs, can keep your browsing data private and inaccessible to your internet service provider (ISP), the government and hackers. Stick around as we explain what a domain name system (DNS) is, how it works and how you can change your DNS server.
Meet the experts
Learn more about our editorial team and our research process.
What Is a DNS?
In order to understand each other, machines communicate using languages that aren’t easy for the average person to understand and use. Every device on the internet has its own IP address that it uses to communicate with other devices, like the way you need a mailing address to send a Christmas card to your grandma.
Online Security
Check out our online security courses and grab a limited-time offer.
Enrollment available now!
Enroll Now 
The domain name system (DNS) assigns domain names to IP addresses.
However, numerical IP addresses are hard to remember, which is why we use the domain name system instead. The domain name system, or DNS for short, assigns a domain name to every IP address belonging to a website.
Thanks to the domain name system, you can access a website by simply typing its name into the browser (say, Google.com) instead of entering a complicated IP address, like 192.168.10.254.
What Does Changing Your DNS Do
The above operation is known as a DNS request or DNS query. When you send a DNS request to a website, a DNS server translates the DNS address into its corresponding IP address. This means that your DNS traffic needs to pass through a DNS server before it can reach the target website or online server.
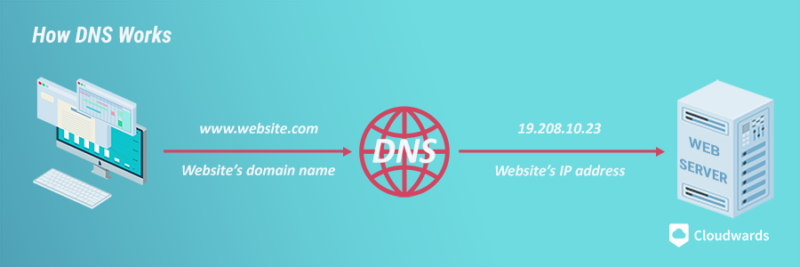
DNS servers resolve DNS queries by translating DNS addresses into IP addresses.
By default, your internet service provider (ISP) handles your DNS requests via its own DNS servers. This allows your ISP to see all of your traffic data. According to the FTC, ISPs collect a lot more data than is necessary and use legal loopholes to sell it to third parties, like advertisers. If you want your data to stay private, you need to change your DNS server to a private one.
Additionally, many DNS services let you control the content you can access. For example, they might offer a family-friendly DNS that lets you set parental controls, or a malware-blocking DNS that prevents your device from communicating with malicious websites such as phishing sites. These specialty DNS servers usually have a different address than the standard one.
Finally, switching your DNS provider can increase your internet speeds. Cloudflare claims to be the fastest DNS resolver available, while Google Public DNS has all the resources of the search giant behind it — including its worldwide server network — guaranteeing fast speeds around the globe. Depending on your ISP, switching to one of these DNS services might result in a faster connection.
How to Change DNS Servers Using a VPN
The easiest way to change your DNS server is to use a VPN. Most reliable VPNs operate their own DNS servers, which means that your DNS requests are subject to the VPN’s no-logs policy. This policy promises to retain no record of your internet activity.
Setting up a modern commercial VPN is as easy as installing a VPN and switching it on. This will automatically connect you to a server (usually the fastest or nearest one) and change your DNS server to a VPN-operated one.
Changing Your DNS Manually
However, if you don’t want to purchase a VPN subscription, you can use a free third-party DNS server. Cloudflare is a popular choice. It only keeps logs for 24 hours, and it’s our recommended custom DNS server.
OpenDNS is another popular DNS provider, though it’s operated by Cisco and doesn’t have a zero-logs option. Google Public DNS is another free DNS option, but it’s subject to Google’s own privacy issues.
DNS Server Addresses
To change your DNS server settings manually, you’ll need to input the DNS server addresses of the provider you want to use. The following DNS server addresses belong to Cloudflare, OpenDNS and Google Public DNS for internet protocol version four (IPv4) and version six (IPv6) connections.
Cloudflare
IPv4
- Primary DNS address: 1.1.1.1
- Secondary DNS address: 1.0.0.1
IPv6
- Primary DNS address: 2606:4700:4700::1111
- Secondary DNS address: 2606:4700:4700::1001
OpenDNS
IPv4
- Primary DNS address: 208.67.222.222
- Secondary DNS address: 208.67.220.220
IPv6
- Primary DNS address: 2620:119:35::35
- Secondary DNS address: 2620:119:53::53
Google Public DNS
IPv4
- Primary DNS address: 8.8.8.8
- Secondary DNS address: 8.8.4.4
IPv6
- Primary DNS address: 2001:4860:4860::8888
- Secondary DNS address: 2001:4860:4860::8844
How to Change DNS Settings in Windows
Here are a few steps showing you how to change DNS settings in Windows.
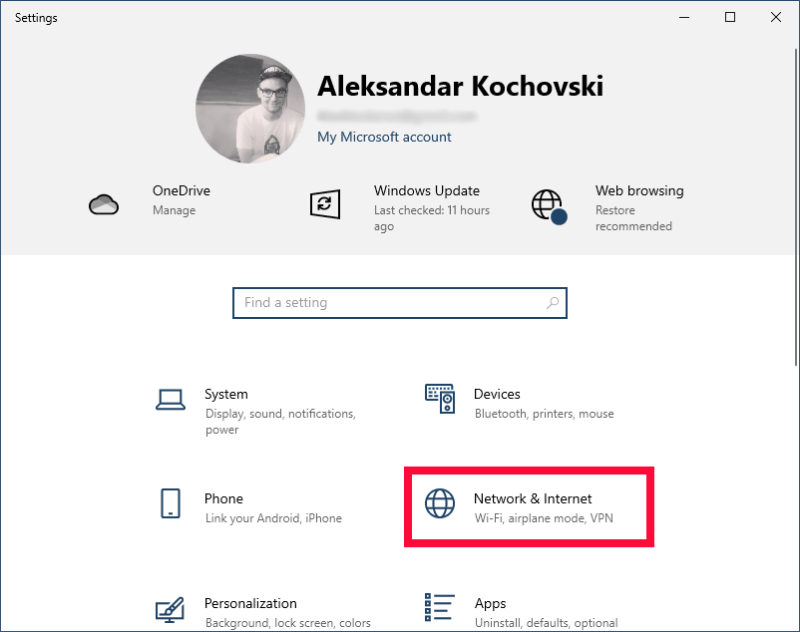
- Access Your Network Settings
Press the Windows key and open the “settings” menu, then click on “network & internet.”

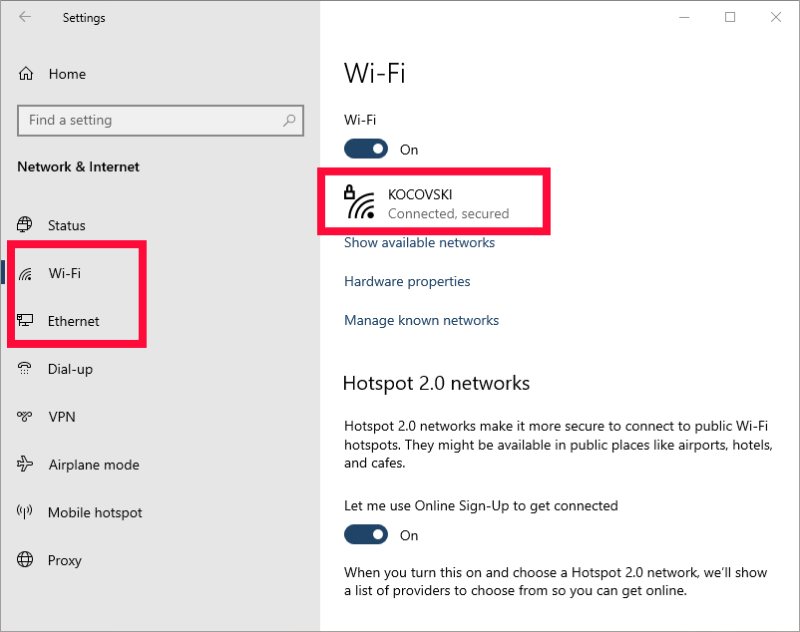
- Find Your Current Network
Choose either the “WiFi” or “Ethernet” tab, depending on your internet connection. Within that tab, select the network you’re connected to.

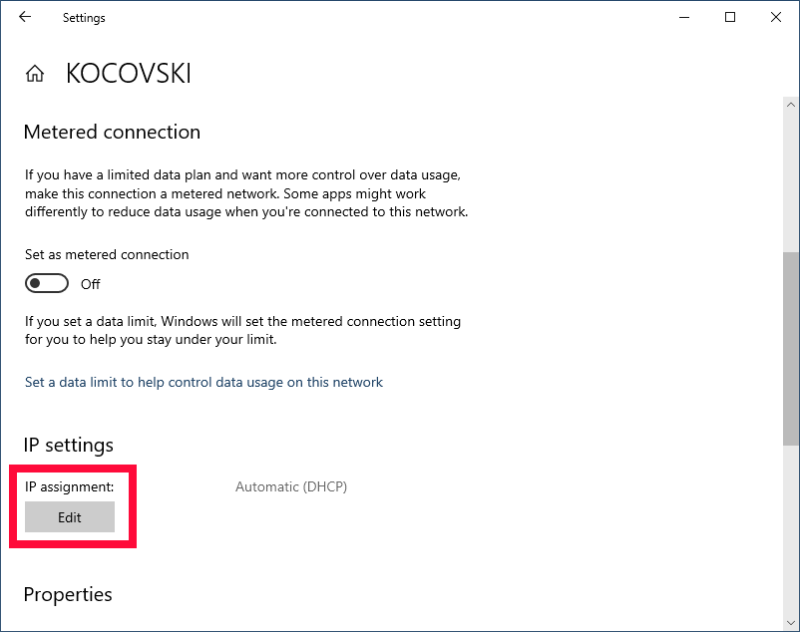
- Access the Network’s DNS Settings
Scroll down to “IP settings” and click on the “edit” button under “IP assignment.”

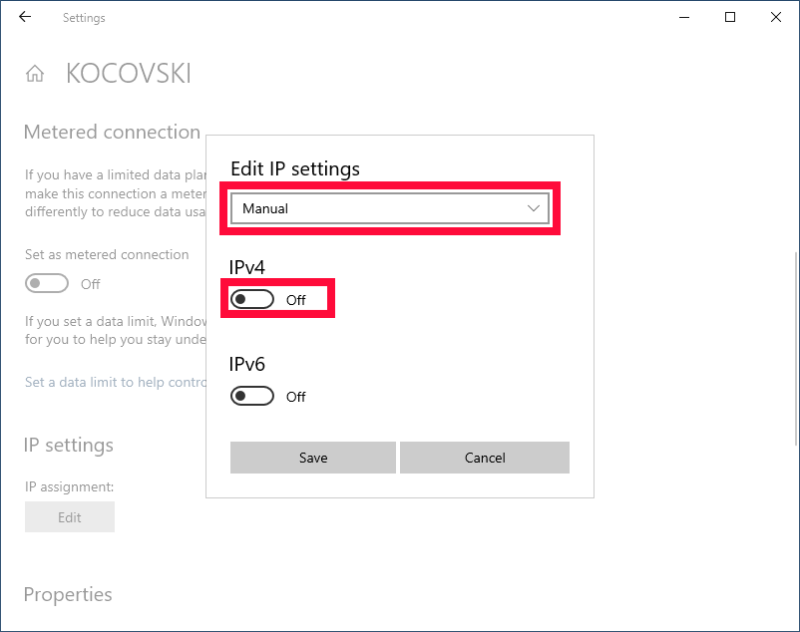
- Toggle on Custom DNS
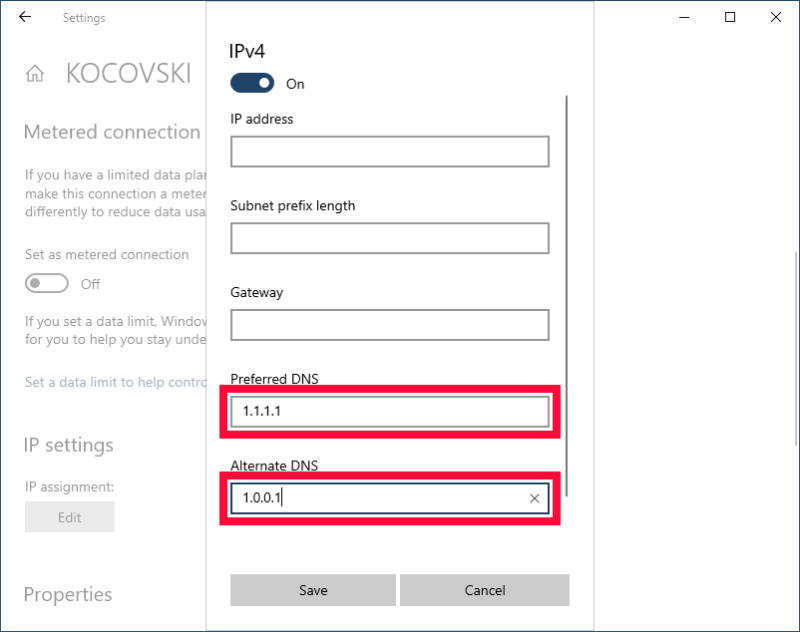
Change your IP settings to “manual” and toggle on the “IPv4” option.

- Input Your Chosen Provider’s DNS Server Address
Under “preferred DNS,” enter the IP address of your preferred DNS server. For example, 1.1.1.1 is Cloudflare’s primary DNS server address. Next, enter the secondary DNS server’s IP (1.0.0.1 for Cloudflare). You can find these DNS addresses on the provider’s website. Finally, click “save” and reboot your device.

How to Change DNS Server on Mac
If you’re a Mac user, things are even simpler. Here’s how to change your DNS settings on your macOS device.
- Access Your Network Settings
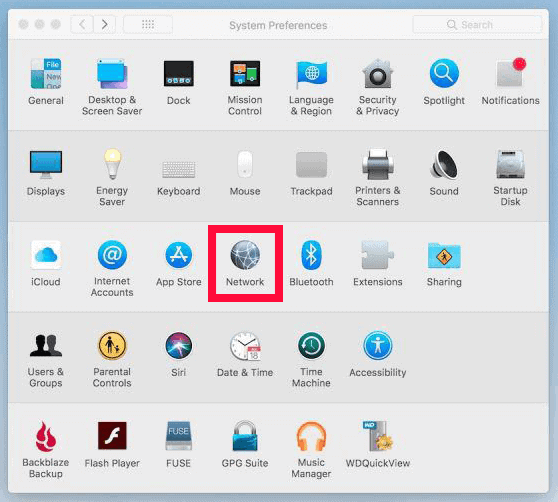
Select “system preferences” from your dock and click “network.”

- Find Your Current Connection
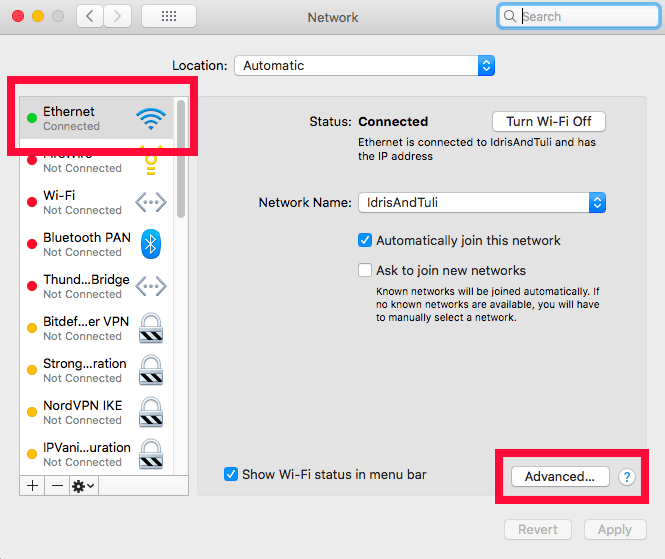
Select your connection (WiFi or Ethernet) and click on “advanced.”

- Enter the Custom DNS Server Addresses
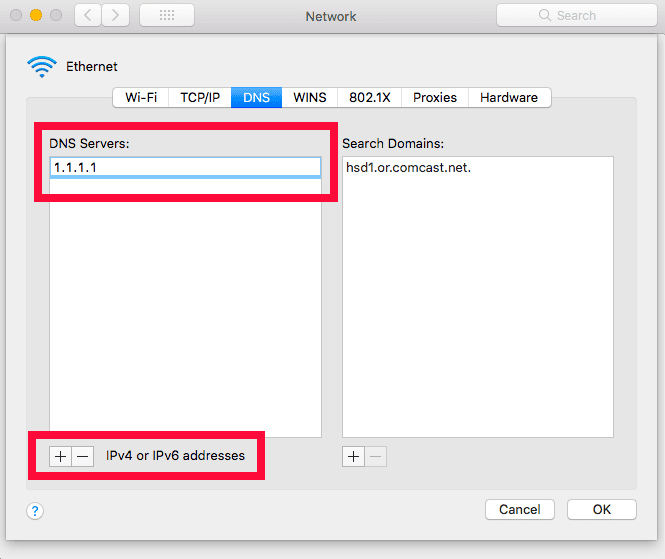
In the “advanced” window, navigate to the DNS tab and click on the plus symbol under the “DNS servers” box. Type in the primary and secondary DNS server addresses for your preferred DNS provider. Click on “OK” to close the “advanced” window, then click on “apply” in the “network” window to apply your custom DNS settings.

How to Change DNS Servers on Your Android Device
You can only change your DNS manually on Android 9 Pie and above. Thankfully, it only takes a few taps to do it.
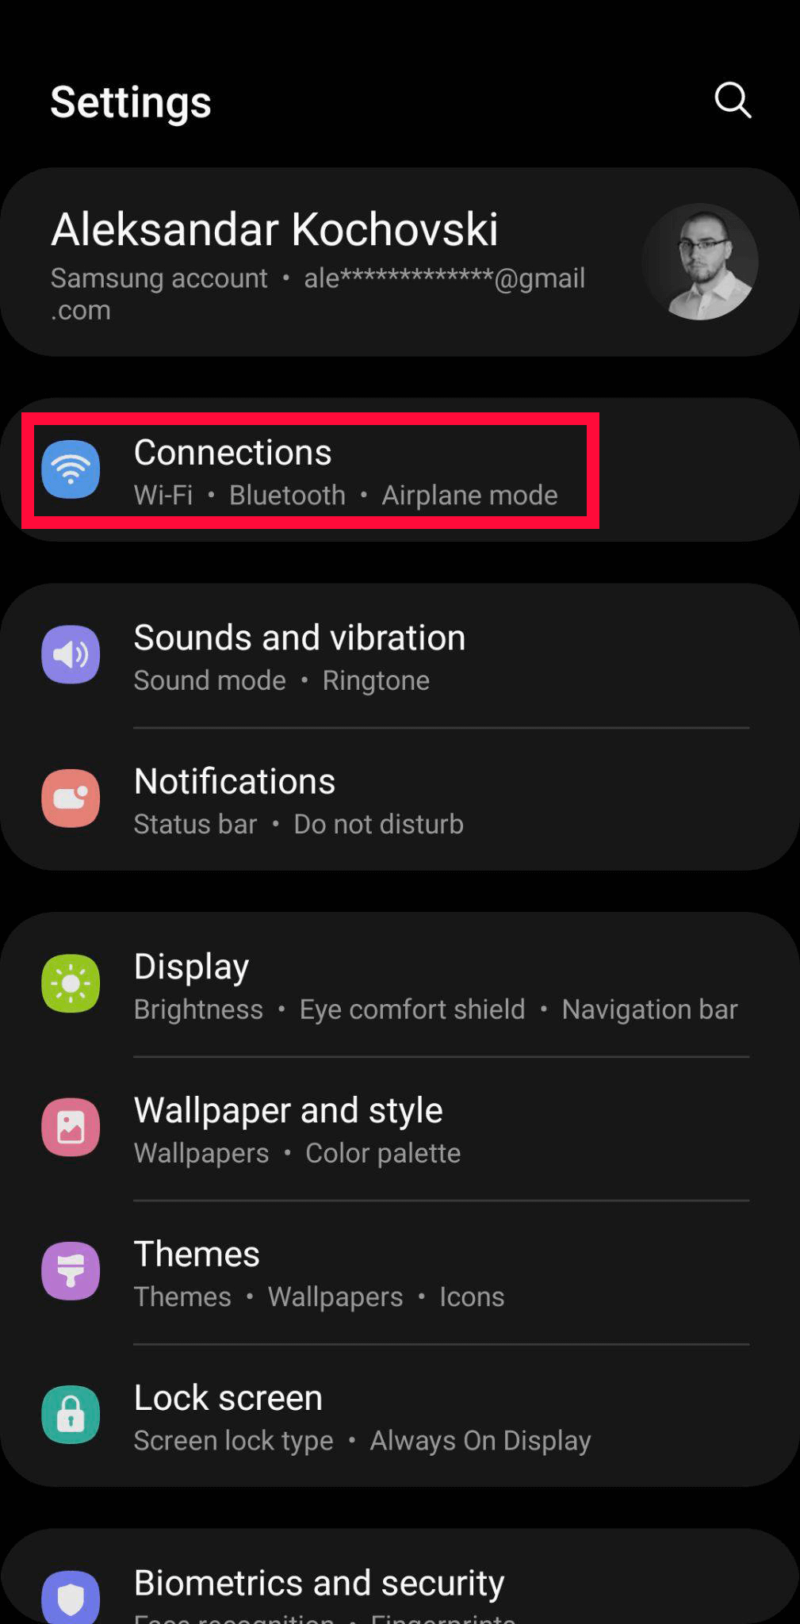
- Open Your Connection Settings
Open Android’s settings and tap on “connections.”

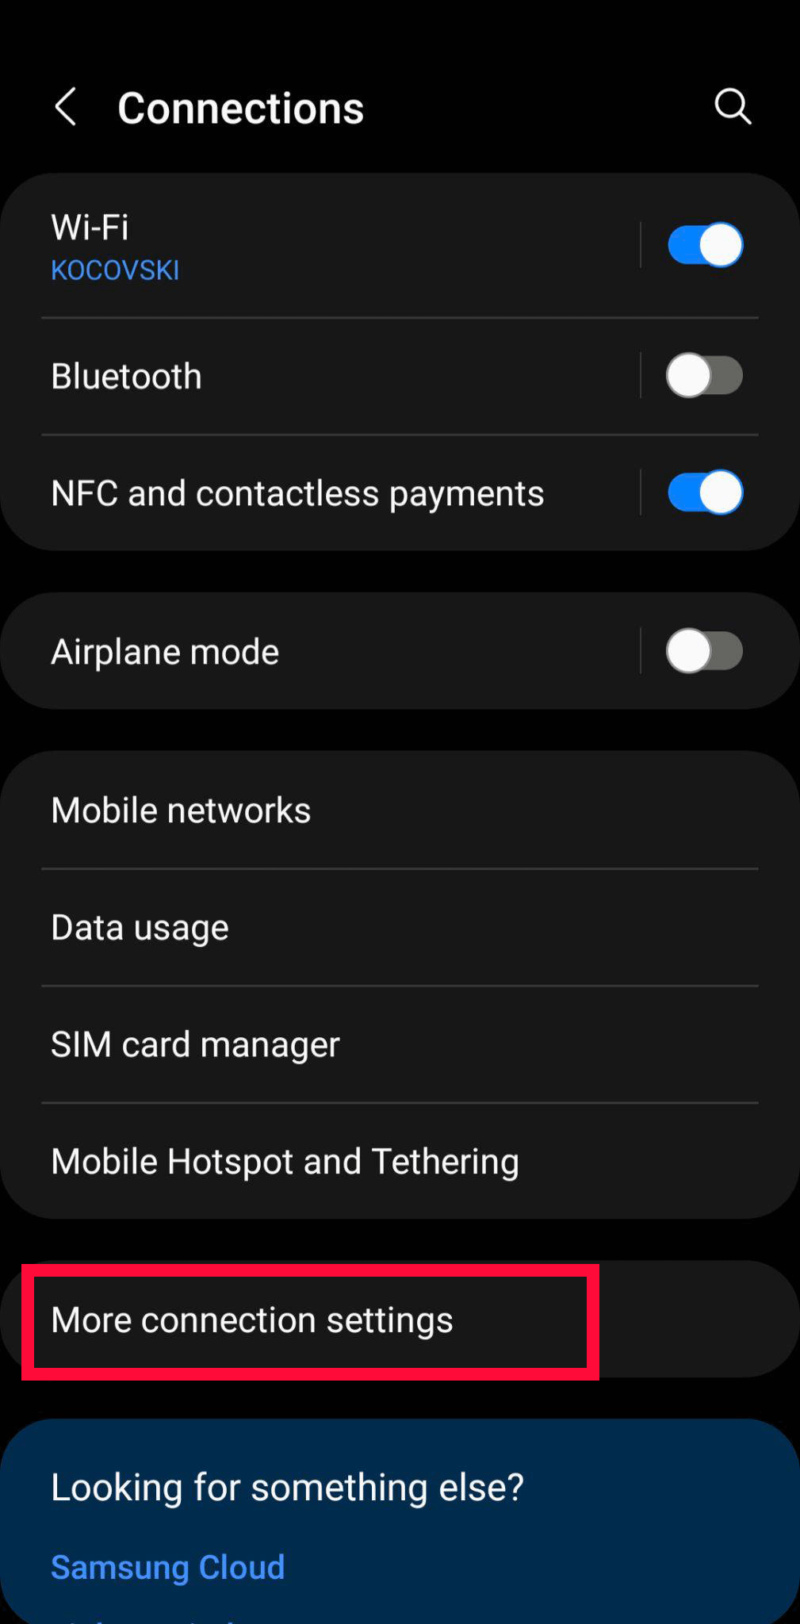
- Open the Detailed Connection Settings
Tap on “more connection settings.”

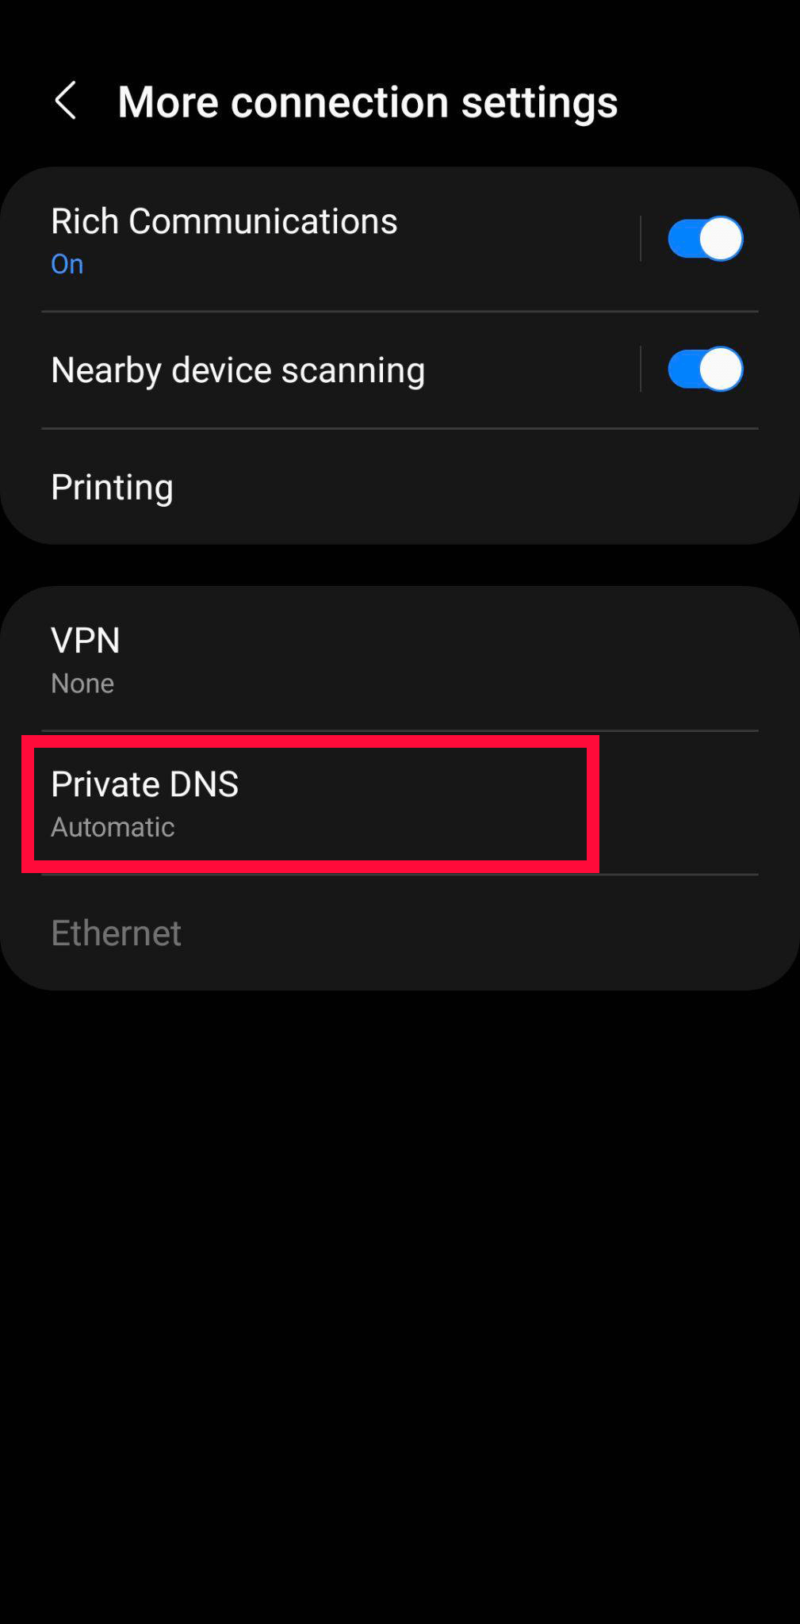
- Open the Private DNS Settings
Tap on “private DNS.”

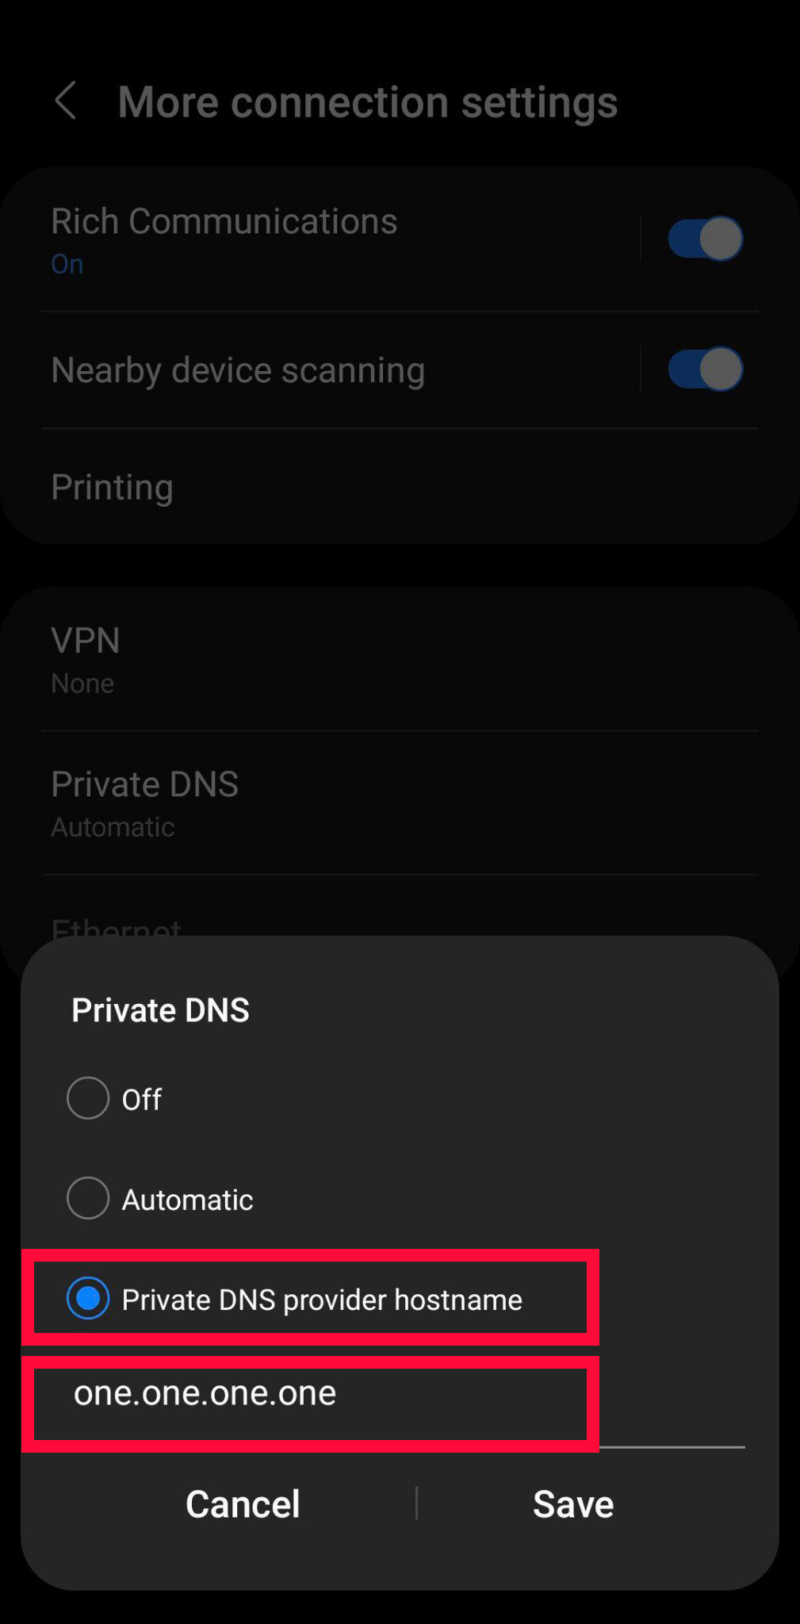
- Enter Your Chosen DNS Provider’s Hostname
Select “private DNS provider hostname” and add the hostname of the service you chose. Keep in mind that this is not the same as the DNS server address. For example, one.one.one.one is Cloudflare’s hostname. Finally, just tap on “save” to apply the settings.

How to Change DNS Server on iPhone
Finding the DNS settings in iOS isn’t as obvious as it is for Android, but it’s still pretty straightforward if you follow the steps below.
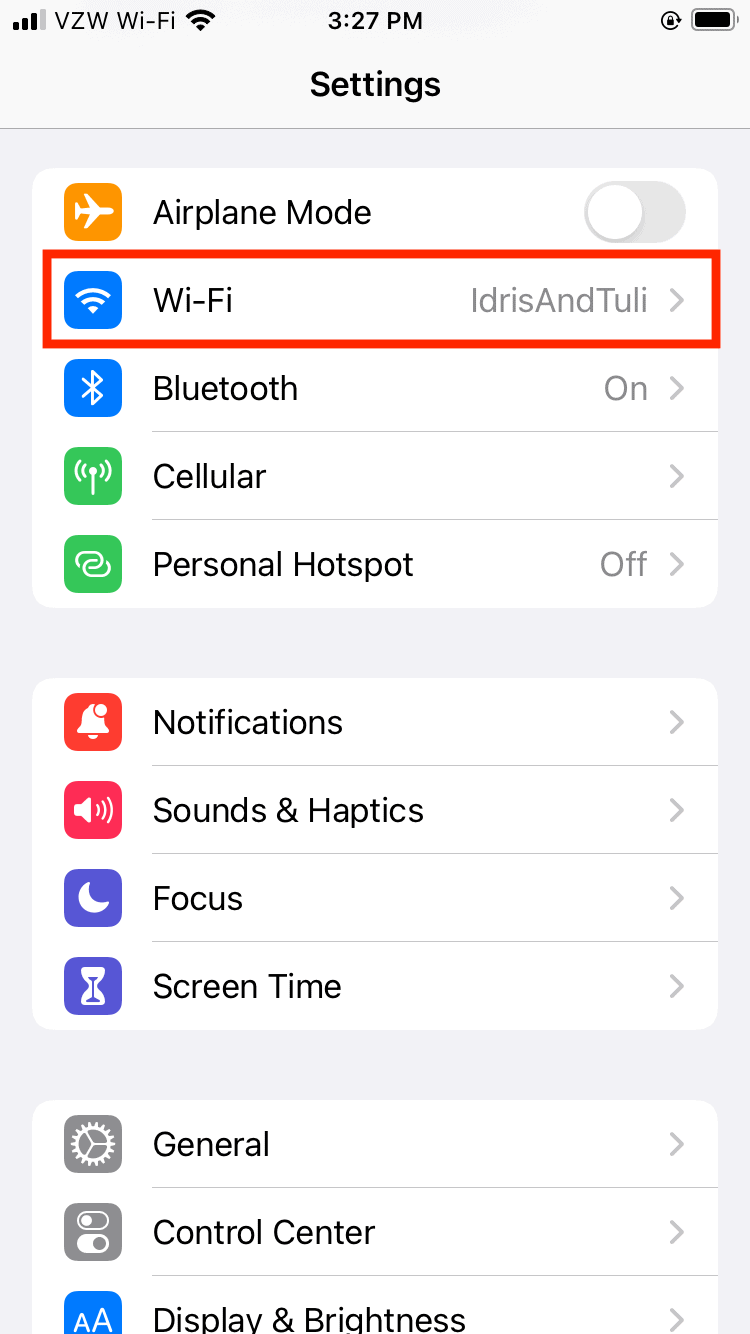
- Open Your WiFi Connection Settings
Open the settings app and tap on “WiFi.”

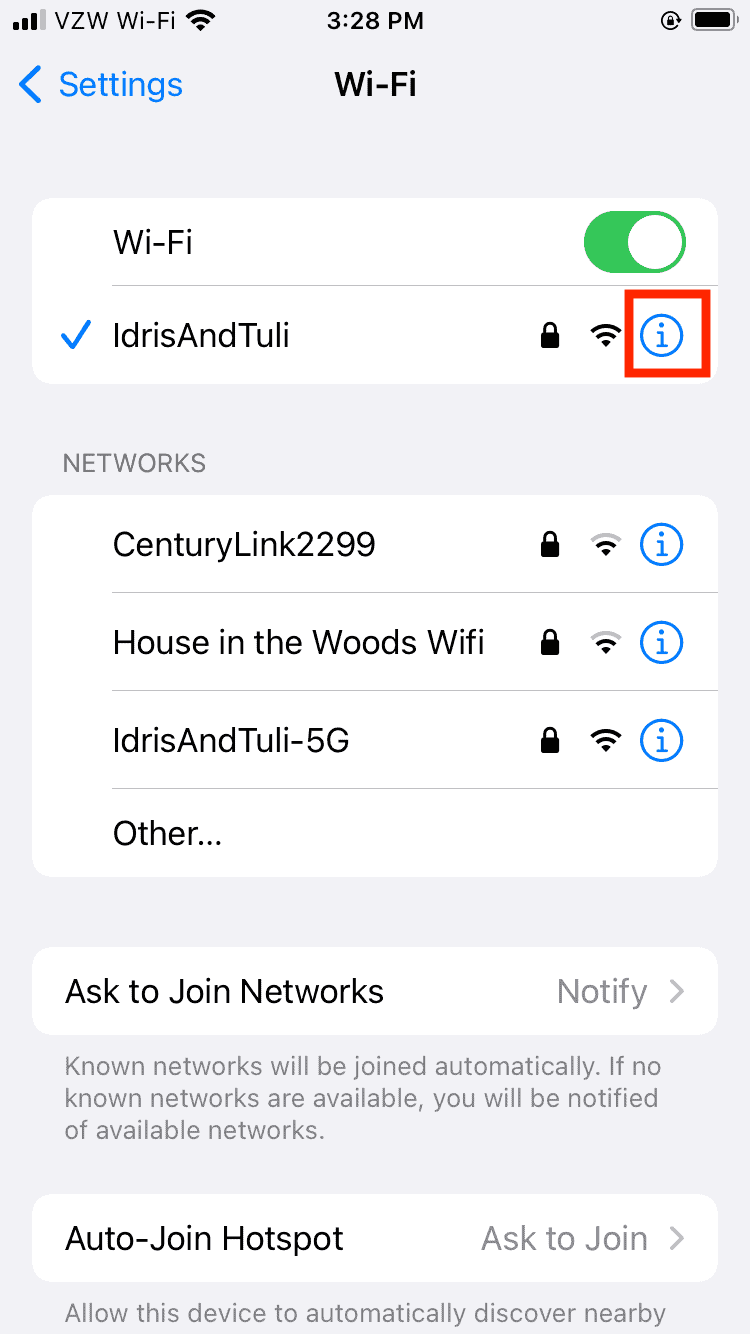
- Access Your Connection’s Properties
Tap on the “i” icon next to your active connection.

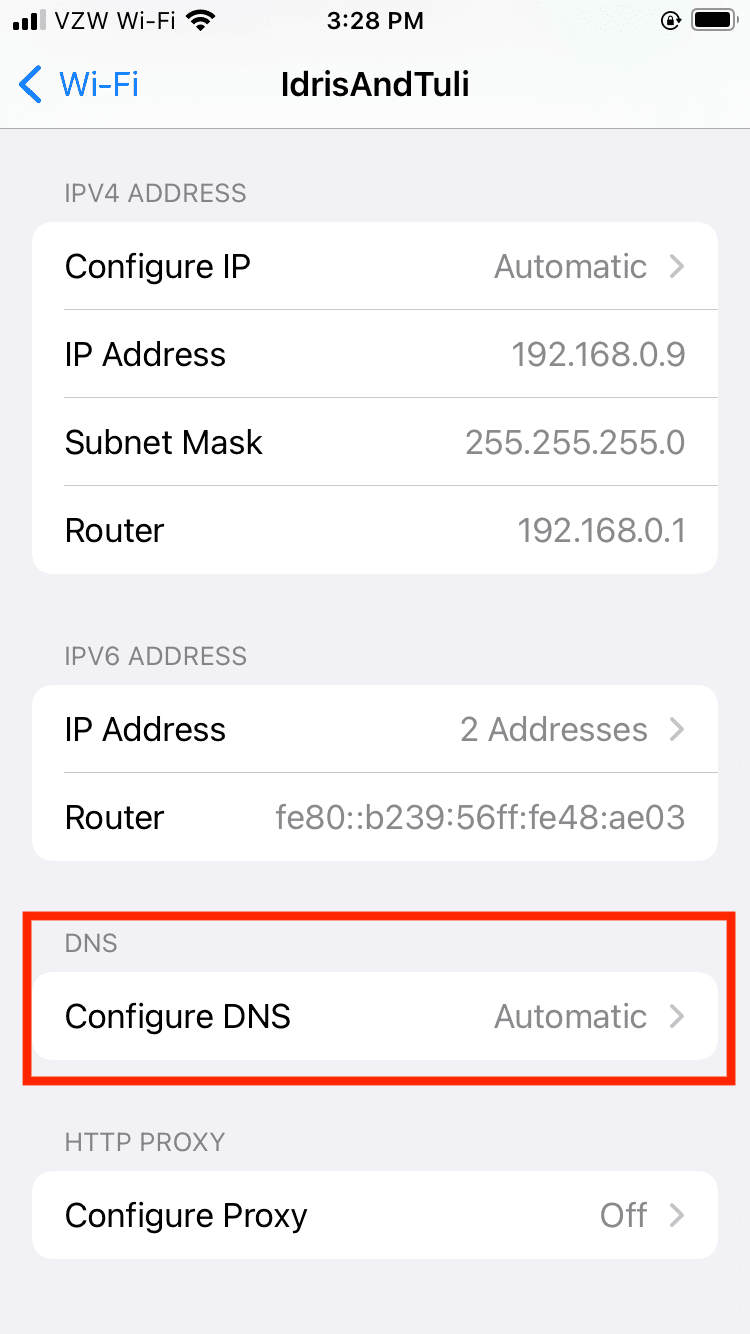
- Open the Custom DNS Settings
In the window that opens, scroll down to “configure DNS” and tap on it.

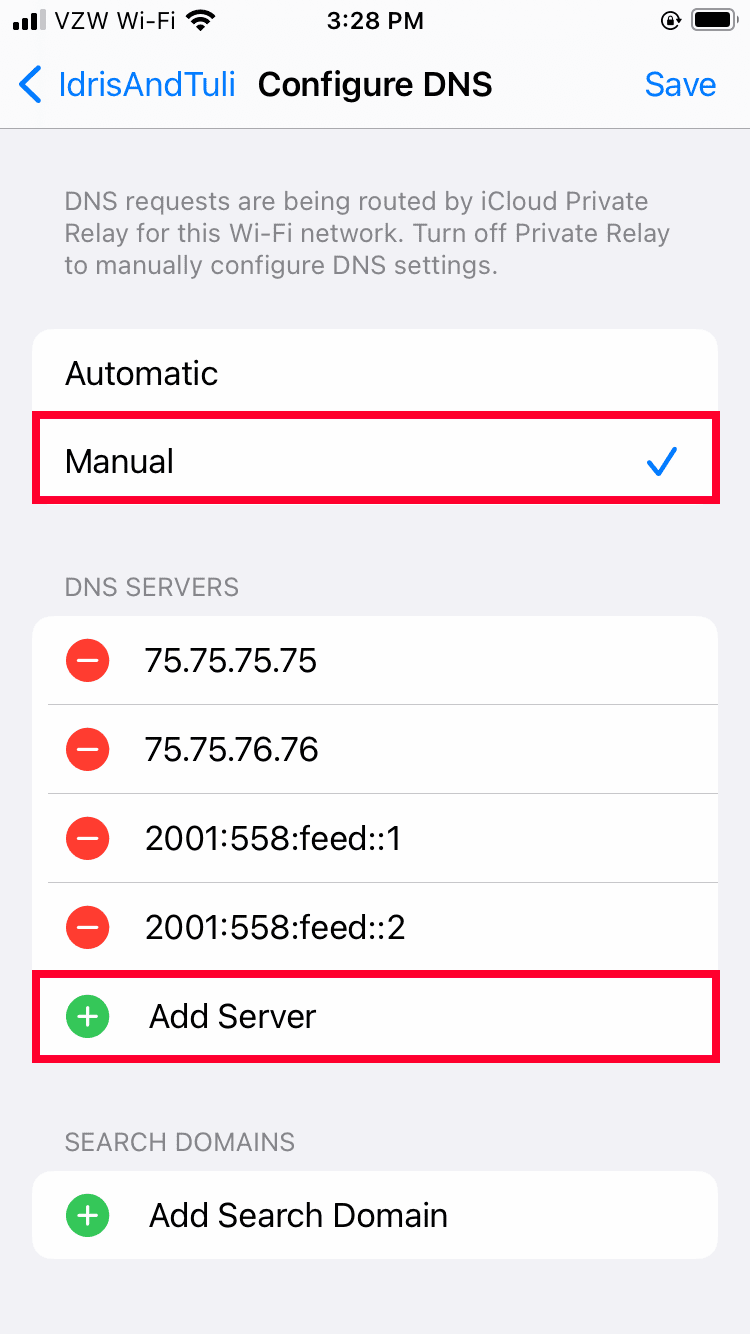
- Add Your Chosen DNS Server
Select “manual” and then tap on “add server.” Add the IP addresses for the DNS servers you want to use. Remember to add the addresses for both the primary and secondary DNS servers. Finally, tap on “save” to finish the setup.

How to Change DNS Settings on Your Router
There’s one major benefit to setting up a custom DNS on your router in that your router handles the traffic for all the devices connected to your home network. This means that all of your internet traffic will be routed through your chosen DNS server without having to set it up on each device manually.
However, not all routers will let you set up a custom DNS server. Routers that support custom firmware like DD-WRT or Tomato will usually allow you to change DNS settings, but most ISP-provided routers will not have this feature. Here is a list of some router manufacturers that let you change DNS servers:
- Linksys
- ASUS
- Netgear
- D-Link
- Ubiquiti
That said, even routers that do support DNS switching will have drastically different setup instructions, so you’ll have to look for a guide on the router manufacturer’s website. You can also switch DNS providers by installing a VPN on your router, though you’ll need to find a guide for your specific router on the VPN’s website.
How to Change DNS Server Addresses With a Smart DNS Service
Smart DNS is a way to access geoblocked content (content that is restricted to a certain geographic area). It changes your DNS server while removing geographically identifying data from your traffic, which lets you access select streaming services in certain popular locations, like the U.S. and U.K. Learn more in our comprehensive Smart DNS guide.
This type of service is usually offered by VPNs as an alternative to using a VPN to unblock content for devices that don’t support VPNs natively, like some smart TVs.
These include Surfshark’s Smart DNS, NordVPN’s SmartDNS and ExpressVPN’s MediaStreamer. You should be able to find a guide on how to set up your VPN’s smart DNS service on your device on the VPN’s website.
Final Thoughts
Changing your DNS server to a free public DNS is an easy way to improve your online privacy, as long as you choose a trusted DNS provider. DNS providers can do more than just resolve your DNS queries; they can block malware and pornographic content, and even speed up your connection.
Have you changed your default DNS server? What DNS provider have you used? Have you tried changing your DNS using a VPN? Let us know in the comments below, and as always, thank you for reading.
FAQ
-
Changing DNS server settings can result in better privacy and security, and faster connection speeds.
-
8.8.8.8 is the address of Google Public DNS, which isn’t the best choice when it comes to privacy.
-
Changing your DNS configuration manually usually requires that you go into your device’s settings and input the DNS server addresses of your chosen provider.
Changing DNS server settings can result in better privacy and security, and faster connection speeds.n”}},{“@type”:”Question”,”name”:”Should I Use 8.8.8.8 DNS?”,”acceptedAnswer”:{“@type”:”Answer”,”text”:”
8.8.8.8 is the address of Google Public DNS, which isnu2019t the best choice when it comes to privacy.n”}},{“@type”:”Question”,”name”:”How Do I Change My DNS Manually?”,”acceptedAnswer”:{“@type”:”Answer”,”text”:”
Changing your DNS configuration manually usually requires that you go into your deviceu2019s settings and input the DNS server addresses of your chosen provider.n”}}]}]]>
Let us know if you liked the post. That’s the only way we can improve.

