
Snowflake continues to set the standard for data in the cloud by removing the need to perform maintenance tasks on your data platform and giving you the freedom to choose your data model methodology for the cloud. Cloud offers limitless scalability, and with Snowflake’s unique cloud-based architecture we can increase platform efficiency to make your Snowflake credits go even further with Data Vault.
This is blog post number 9 (out of sequence, get it?), the final post in our “Data Vault Techniques on Snowflake” series:
- Immutable Store, Virtual End Dates
- Snowsight Dashboards for Data Vault
- Point-in-Time Constructs and Join Trees
- Querying Really Big Satellite Tables
- Streams and Tasks on Views
- Conditional Multi-Table INSERT, and Where to Use It
- Row Access Policies + Multi-Tenancy
- Hub Locking on Snowflake
- Out-of-Sequence Data
- Virtual Warehouses and Charge Back
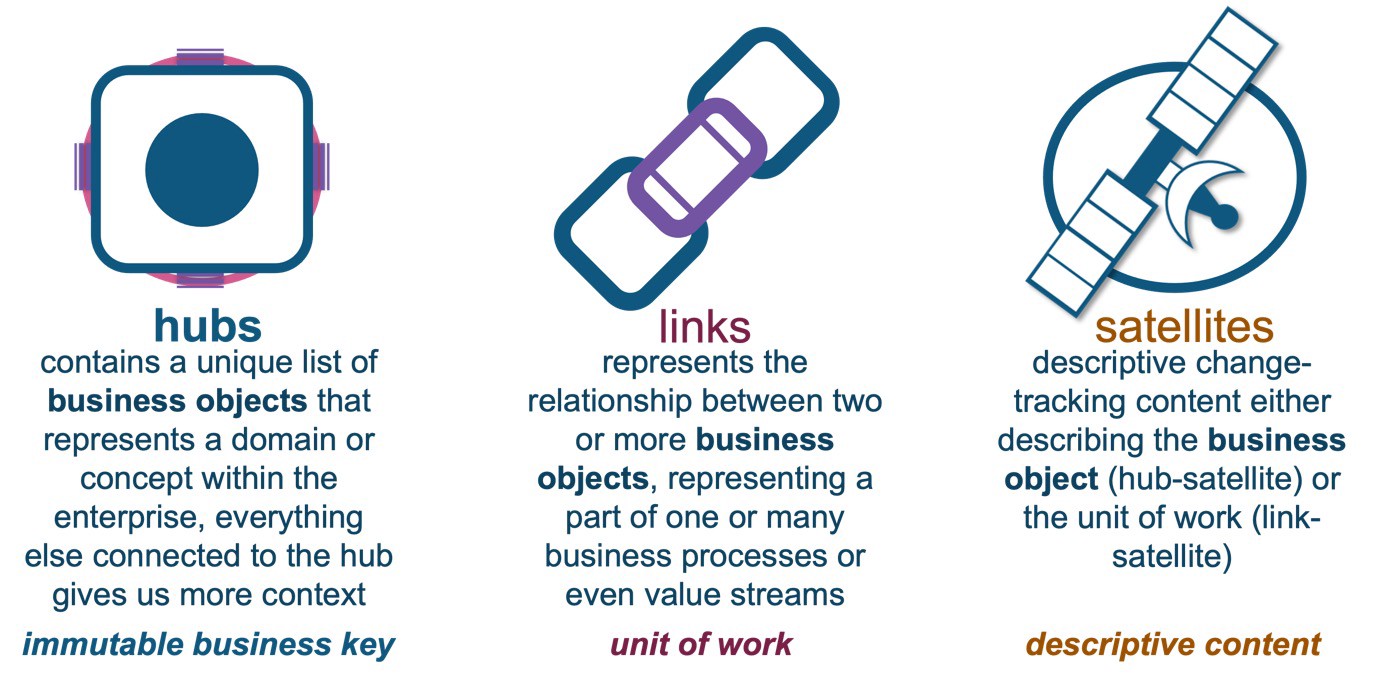
A reminder of the Data Vault table types:
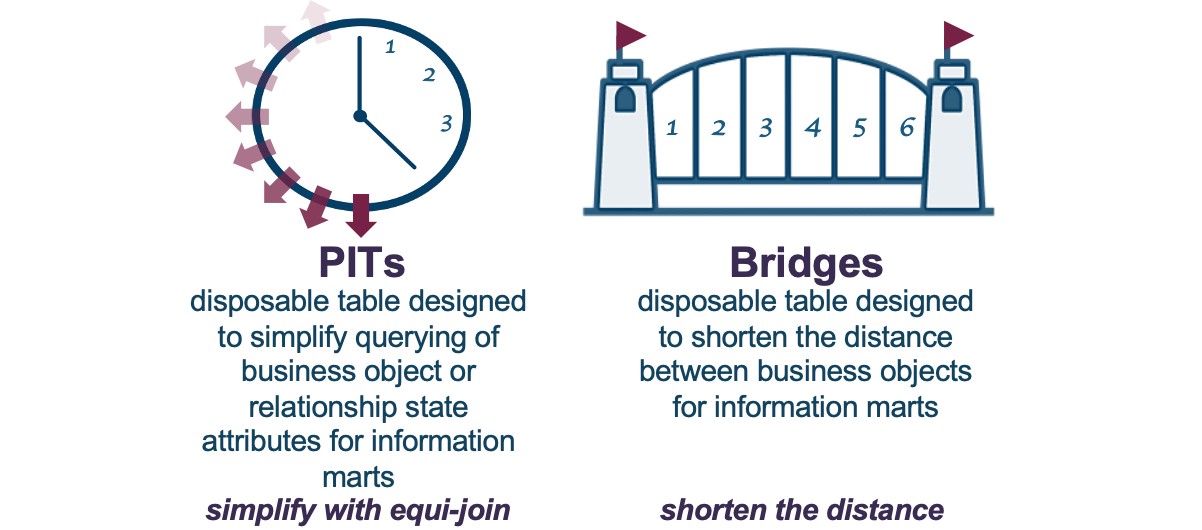
If we so choose, we can use the query assistance tables to optimize performance and simplify access over a Data Vault.
The Snowflake Data Cloud simplifies your data architecture. Your experience on Snowflake isthe same on any of the Big Three’s infrastructure, and you can share data between Snowflake accounts globally, across CSPs, or within a CSP.
For our workload in this post, we will focus on an individual Snowflake account and how to leverage that for a Data Vault.
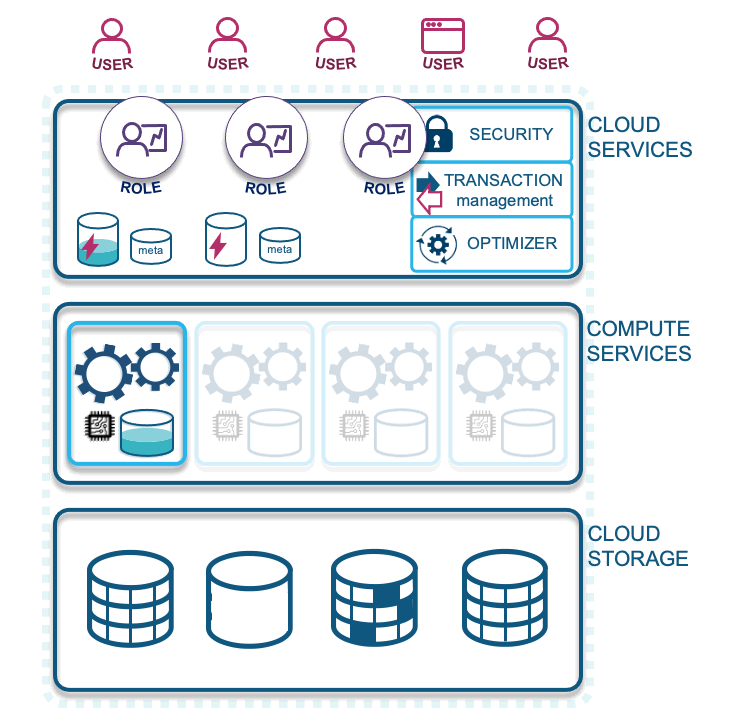
 This simple configuration may be all you need.
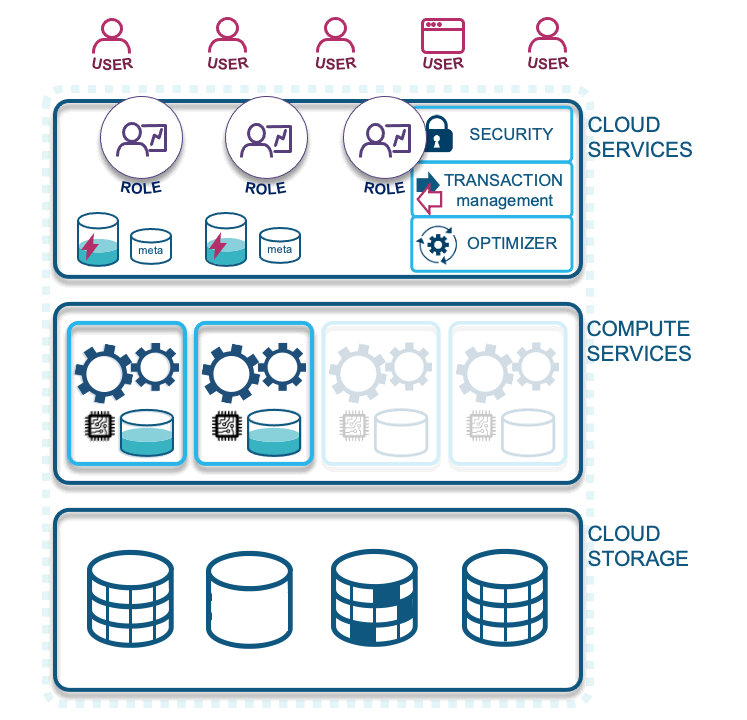
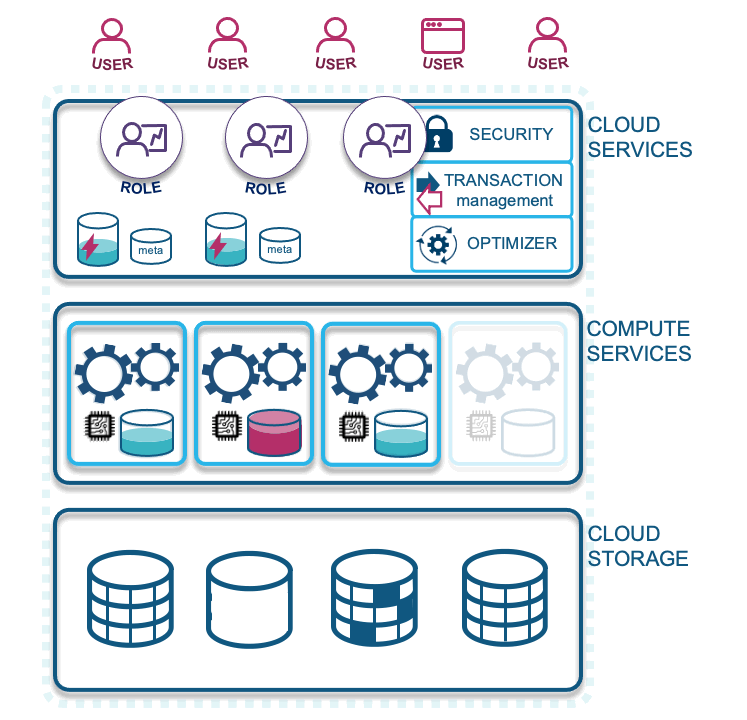
Let’s describe each layer illustrated in the diagram above:
- Cloud services: Your access to Snowflake technology. Snowflake is a fully managed service with security guarantees for your data loaded into the cloud. In this layer Snowflake optimizes your cloud experience around your data, with the elastic scalability the cloud provides, to offer a dynamic, pay-for-what-you-use service.
- Compute services: Snowflake-wrapped virtual machines labeled as virtual warehouses that are assigned by you to ingest and query data in the CSP of your choice (and recently announced support for querying your on-premises data via S3 compliant storage devices). Essentially, the computations facilitated on your data is what Snowflake will charge you for. These are separate charges from storage, which allows for massively parallel processing to occur concurrently and without workload contention.
- Cloud storage: Supported external formats include Parquet, AVRO, ORC, JSON, and CSV, and internal storage is configured as Snowflake proprietary table types that are both columnar, and row-optimized micro-partitions.
Snowflake’s tables can store a mix of structured and semi-structured data and outside of tables, you can store unstructured data in Snowflake as well.”
Now let’s focus on an individual Snowflake account and how to leverage that for a Data Vault.
Separation of concerns
Instead of tightly coupling architecture objects, Snowflake’s architecture offers a separation of concerns(SoC). Storage is separated from compute and metadata are mere pointers to these objects and their interactions. A single Snowflake object can do nothing, but in combination with other Snowflake objects can do work! A virtual warehouse cannot be accessed without a role, a role is not authorised to use a virtual warehouse unless granted the privilege to do so. And a role cannot use data objects unless it has privileges to do so too.
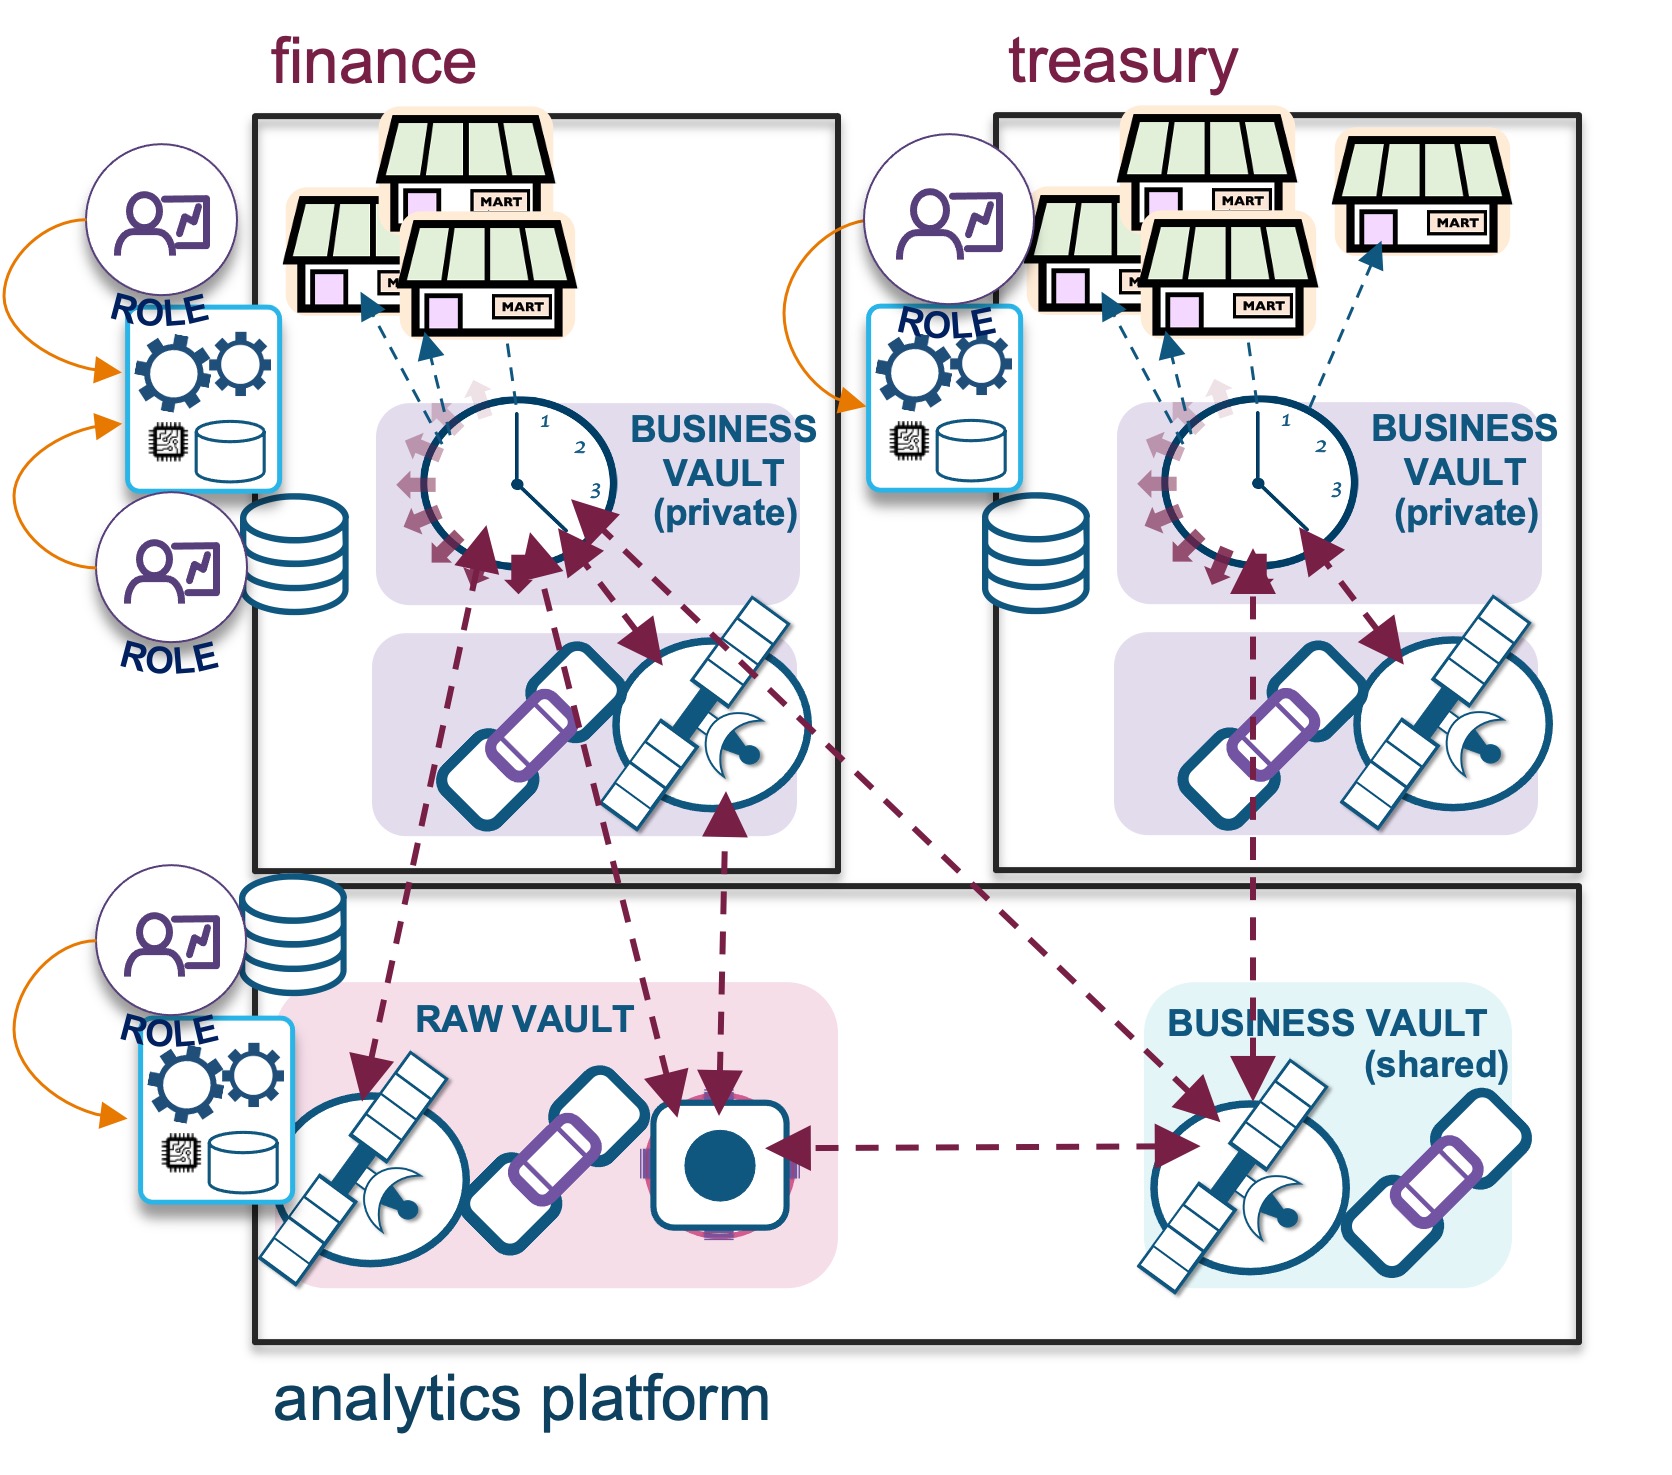
The same SoC principle applied by Snowflake is applicable to Data Vault and its table types, your business is focused on:
- Business objects are the center points of your organization. They drive your organizational capabilities because in essence the organization maintains capabilities to serve these business objects with services and/or products. A business object without context is just a business object. We store the immutable business key in hub tables.
- A unit of work (UoW) exists between business objects, the transactions (i.e., relationships) between business objects are the business events that you will record for past or present. UoW describes the relational context and interactions between business objects that we store as link tables in a Data Vault.
- State data describes the nature of the above at a specific point in time. These facts can be superseded by change, but we keep that historical context in the Data Vault as an audit trail, providing the business object and UoW data lineage.
SoC is built into Data Vault just as it is built into Snowflake; both offer near-limitless scalability and elasticity, which means that new objects can be added or updated without impacting other objects.
Now let’s look at Snowflake caching and how it can be used to optimize your Data Vault experience on Snowflake:
Caching in Snowflake
Let’s start with the first query:
 First query
- First query: Users or services need a Snowflake role to use or manipulate data in Snowflake. A first query will spin up an allocated virtual warehouse that is configured to do so automatically. That first query must traverse from cloud services through compute services to get to the stored data. Along the way, both data from that query is stored in the virtual warehouse cache (configured to suspend by you the customer, minimally set at 1 minute to as long as you like) and the query result is stored in the result cache for 24 hours, on a continual clock and for up to one month (when Snowflake refreshes the cloud services cache).
Here’s a simple query over an information mart, stored as a view:
Select * from information_marts.card_daily_mart;
Every query run in Snowflake is associated with a unique, auto-generated query-id at runtime and represented as a GUID. After running the above query, we can store that query-id in a custom parameter and use it as a base for our queries that need that query result.
set card_daily_mart_parm = (select last_query_id());  Second and third queries
- Second query: With a Snowflake role that has access to the same data and the same query result, they benefit from the earlier result being cached; it does not need to traverse compute services or reach into cloud storage to fetch the data it needs. The second query will access the previously fetched query result in the result cache, provided that no context functions were used in the result and no underlying data has changed. This optimizes your queries because data does not need to traverse up the network. Subsequent queries that use a portion of the already fetched data will need to pull additional data from cloud storage and augment it with the cached content on a virtual warehouse. This latter scenario is why virtual warehouses should not be immediately suspended after use, because that action will flush the cache from the virtual warehouse, and you could potentially be missing out on this performance optimization.
Running the exact same query will produce the exact same result from the result cache, but we can also use the query-id we stored earlier to fetch that same query result.
select * from table(result_scan($card_daily_mart_parm)); 
Try it yourself! 100% from result cache!
 Query 4
- Querying with another warehouse: A role with different access and associated virtual warehouse will not share virtual warehouse cache, which should be a consideration for your design—whether your enterprise will benefit by combining virtual warehouses or not.
Snowflake charges for the first 60 seconds when a virtual warehouse is spun up, then per-second credits are charged until the virtual warehouse is suspended. This is something to consider whenever you’re utilizing a virtual warehouse. Although you may spin one up and use it for only 30 seconds, you will still be charged for 60 seconds worth of credits. This is why you should consider combining your roles to a warehouse, or shorten the time to suspend the warehouse instead of using the default 10-minute suspension time.
Snowflake does support serverless execution of code as well, which is charged at a per-second rate from the start of the execution. Serverless compute are those operations that you configure Snowflake to execute on your behalf, such as maintaining materialized views, auto-clustering tables, and using serverless tasks, to name a few.
 Query 5
- Autoscaling: Virtual warehouses can also be configured to auto-scale horizontally should the workload on a virtual warehouse begin to queue.
For autoscaling, you will be charged for an XSMALL virtual warehouse and for every instance that is spun up for your workloads. Once the queue is cleared, Snowflake will suspend the new virtual warehouses automatically as needed. The question is what virtual warehouse “T-shirt” size do you need to start with. The recommended advice is to always start with an extra small before deciding to increase the size, or to configure auto-scaling for your virtual warehouses.
You can set auto-scaling limits by setting lower and upper bounds for Snowflake to operate against, and you can set scaling policies based on how you perceive queued queries should be handled. This is an important concept, because each virtual warehouse that spins up is its own unit—there is no contention between queries being run on your data on different virtual warehouses. If all your workloads are concentrated into one virtual warehouse, there could be contention and query queuing. This is how Snowflake achieves massive parallel processing, by being as elastic as the cloud has been designed to be.
 Loading data
- Loading data: Compute is needed to load data into Snowflake, which should be configured on its own virtual warehouse. Because it does not necessarily need as much caching as querying would, these virtual warehouses should be configured to auto-suspend sooner (1-5 minutes is common). The serverless alternative is Snowpipe, but for this blog post we will focus on virtual warehouses only.
Caching should be considered when designing your Data Vault querying and loading needs, and to that end you should consider:
- How can you benefit from the result cache?
- At what frequency does the underlying data get updated?
- What reporting periods do you need to cater for?
Because we default Data Vault information marts as views, any change to the Data Vault tables supporting that view will immediately be visible in the information mart. Your strategy here could be to persist the information mart as a snapshot of the Data Vault tables instead, which of course can be optimized by using streams and tasks, or even by deploying a stream on the view itself!
Now that we have seen how we can use Snowflake caching to optimize your querying experience, let’s explore some strategies for enabling charge back on your Snowflake account.
Charge back in Snowflake
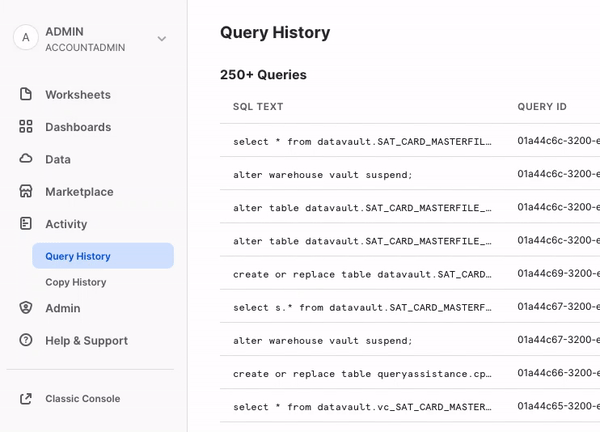
A role is needed to do any work in Snowflake. The role itself will need access to data and to a virtual warehouse to perform any work on that data. Metrics for virtual warehouse utilization is metered and accessible via:
The former has a latency of up to 3 hours but is retained for a year. The latter is immediately available and is retrieved from your database’s information_schema with a lower retention period.
As a single Snowflake account owner, you can charge your platform tenants (individual business units) accurately for those using your platform. This combination of virtual warehouse and roles means you can also track the cost to ingest data into your raw and business vault. A single virtual warehouse may be shared by multiple roles to consolidate credit spend should you find that a virtual warehouse is being underutilized. A single role may be entitled to access and use multiple virtual warehouses as well, with differing configurations to allow the role to use or modify associated virtual warehouses. For a given business unit, you can isolate usage to data labs and other exploratory workloads, and cap virtual warehouse usage with a resource monitor.
 Zones and Layers
The capping of a virtual warehouse can be set to the frequency of your choosing. For example, you could set a credit spend limit per week or per month, and configure the resource monitor to send alerts and notifications when a business unit is nearing a capacity limit. You can also configure the resource monitor to terminate business unit workloads until the next spending period—it’s completely up to you! Setting up resource monitors is recommended for novice Snowflake users, or those that are especially cautious about their credit spend.
As we discussed in a previous post, if you have set up a Snowflake organization and decided to allocate independent Snowflake accounts to business units or partners, then the credit spend can be universally tracked under the organization’s:
To further analyze your credit spend, Snowsight provides some out-the-box charts and graphs to visually depict warehouse usage, as shown below:
 Example of billing and virtual warehouse visualizations
What’s more, you can also build custom Snowsight dashboards to get the analysis you need, along with Snowflake’s partner BI tools that come with their own guidance on building these dashboards:
Keep in mind that compute charges are also accumulated via serverless processing on your Snowflake account. The above only discusses allocating chargeback by linking virtual warehouses and roles.
Fin! The Data Vault series comes to an end
This concludes our 10-part series on Data Vault techniques for Snowflake. I hope these articles have helped you visualize the possibilities for optimizing your Data Vault on Snowflake, and that you have found some of these techniques useful. Ultimately, what we look for in Data Vault and with any technology or practice is the ability to execute repeatable patterns. If it is repeatable, then it is scalable. As your scalability translates into savings on Snowflake, you free yourself to spend that budget on new and exciting initiatives to delight your stakeholders and your customers!
Until next time!
Additional Resources:
Originally posted on November 21, 2022 @ 10:02 pm